Homemade Crystallized Ginger: Your Easy Recipe for a Sweet & Spicy Treat
Imagine a sweet, spicy, and chewy bite that awakens your senses, perfect for holiday baking, an afternoon snack, or adding a gourmet touch to your culinary creations. That's the magic of homemade crystallized ginger! While it might sound like a confection reserved for specialty stores, learning how to make crystallized ginger at home is surprisingly straightforward and incredibly rewarding. Not only do you get a fresher, more vibrant product than store-bought versions, but you also gain delicious byproducts like ginger tea and ginger simple syrup.
This comprehensive guide will walk you through every step, from selecting the perfect ginger root to coating your sweet slices in a sparkling sugar crust. Get ready to transform humble ginger into a versatile, delightful treat that will impress family and friends.
What's the Difference: Crystallized vs. Candied Ginger?
Before we dive into the recipe, let's clarify a common point of confusion: are candied ginger and crystallized ginger the same thing? While the terms are often used interchangeably, there's a subtle but important distinction, primarily in their final preparation.
- Candied Ginger: The process for both starts the same way: by boiling fresh ginger in a sugar syrup. To make traditional candied ginger, the ginger pieces are cooked until tender and translucent, then either stored directly in the syrup or removed and allowed to dry until they are still sticky but no longer dripping wet. They retain a moist, glossy finish.
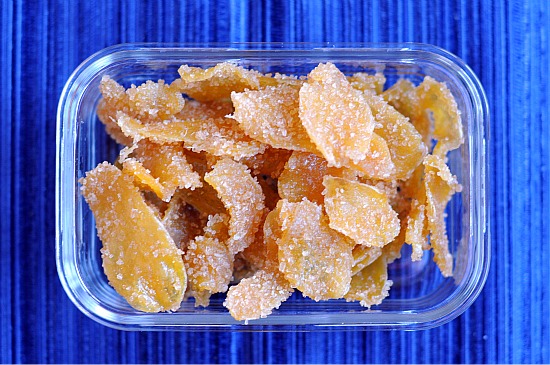
- Crystallized Ginger: This is essentially candied ginger taken one step further. Once the ginger pieces have been cooked in syrup and allowed to dry until slightly tacky, they are then rolled or tossed in granulated sugar. This outer coating of sugar adheres to the sticky surface, giving the ginger a beautiful, sparkling "crystallized" appearance and a delightful textural crunch.
Both forms are delicious and versatile, but the sugar coating of crystallized ginger offers a drier texture and a distinct visual appeal that makes it particularly popular for snacking and garnishing.
Why Make Your Own Crystallized Ginger? Unbeatable Freshness & Control
Beyond the simple joy of creating something delicious from scratch, there are several compelling reasons to make your own homemade crystallized ginger:
- Superior Flavor & Freshness: Store-bought versions, while convenient, often lack the vibrant, piquant punch of homemade. When you make it yourself, you control the quality of ingredients, resulting in a much fresher and more aromatic product.
- Customize Spiciness: One of the greatest advantages is the ability to control the intensity of the ginger's heat. The blanching process (boiling in water) helps to mellow the ginger's natural fire. If you prefer a milder taste, you can blanch the ginger for longer or even repeat the blanching process once or twice. For a bolder kick, blanch for a shorter duration. This level of customization is something you simply can't get from a package. For more on customization, check out our guide on Master Candied Ginger: Customize Shape and Spiciness Level.
- Choose Your Shape: Whether you prefer thin, delicate slices, chunky cubes for a satisfying chew, or elegant strips for garnishing, you have complete freedom to cut the ginger into your desired shapes and sizes.
- Only 2 (or 3) Ingredients: You read that right! Fresh ginger, sugar, and water are all you need. It's an economical way to produce a gourmet treat.
- Delicious Byproducts: This recipe offers fantastic bonus treats – aromatic ginger tea and a versatile ginger simple syrup – making it incredibly efficient and resourceful.
Choosing the Best Ginger and Essential Prep Steps
The success of your crystallized ginger starts with selecting the right ginger root and preparing it properly. Here's what you need to know:
Selecting Your Ginger
For the best results, always opt for fresh ginger. While any fresh ginger will work, younger ginger roots are generally preferred:
- Young Ginger: Characterized by thinner, smoother skin that's easier to peel, often with a slightly pinkish hue on the tips. It's more tender, less fibrous, and typically less intensely spicy than older ginger. This makes for a more pleasant chew and a milder flavor.
- Mature Ginger: Has thicker, rougher skin and can be quite fibrous, making it harder to peel and chew. It also tends to be spicier. If using mature ginger, you might want to blanch it for a slightly longer period to soften the fibers and reduce the heat.
Look for firm, plump roots with no soft spots, mold, or shriveled areas. A healthy ginger root should have a fresh, strong aroma.
Preparing the Ginger
- Wash Thoroughly: Rinse the ginger root under cold water to remove any dirt or sand. Pat it dry with a paper towel.
- Peel with Ease: Peeling ginger, especially those with many nooks and crannies, can be tricky with a traditional peeler. The secret weapon? A sturdy metal spoon! Hold the spoon with its back facing outwards and scrape the skin away from you using the tip and edge of the spoon. This method effectively removes the thin skin without wasting too much of the precious ginger flesh.
- Slice or Cube: Once peeled, you have creative control over the shape.
- Slices: Cut the ginger into uniform 1/8 to 1/4-inch thick slices. A sharp chef's knife works well, or use a mandoline slicer for consistent, paper-thin pieces (exercise caution!). Thinner slices will dry faster and have a more delicate texture, while thicker slices offer a chewier bite.
- Cubes or Strips: For a different texture, cut the ginger into small cubes (about 1/4-inch) or thin strips. These shapes are excellent for snacking or incorporating into baked goods.
Step-by-Step Guide: How to Make Crystallized Ginger
Now for the main event! Follow these steps to create your sparkling ginger treats.
Ingredients:
- 1 pound fresh ginger, peeled and sliced/cubed
- 2 cups granulated sugar (plus extra for coating)
- 2 cups water (plus extra for blanching)
Equipment:
- Medium saucepan
- Slotted spoon
- Wire rack
- Parchment paper or silicone baking mat
Instructions:
- Blanch the Ginger (Mellowing the Heat):
- Place your prepared ginger slices or cubes into a medium saucepan.
- Cover the ginger with fresh water (about 3-4 cups).
- Bring to a boil over medium-high heat, then reduce the heat and simmer for 10-15 minutes. This crucial step softens the ginger and extracts some of its intense spiciness, making it more palatable.
- Carefully drain the ginger, reserving the flavorful liquid! This is your first delicious byproduct: ginger tea.
- Simmer in Sugar Syrup:
- Return the blanched ginger to the clean saucepan.
- Add 2 cups of fresh water and 2 cups of granulated sugar to the saucepan with the ginger.
- Stir gently to dissolve the sugar.
- Bring the mixture to a boil over medium heat, then reduce the heat to a gentle simmer.
- Cook, stirring occasionally, for about 15-25 minutes, or until the ginger becomes translucent, tender, and the liquid has thickened into a syrupy consistency, reducing by about half. The syrup should coat the back of a spoon.
- Remove from heat.
- Dry the Candied Ginger:
- Using a slotted spoon, carefully remove the ginger pieces from the hot syrup. Try to drain as much excess syrup as possible.
- Arrange the ginger pieces in a single layer on a wire rack set over a baking sheet (lined with parchment paper for easy cleanup). This allows air to circulate around the ginger.
- Let the ginger air dry at room temperature for several hours, or even overnight (6-12 hours), until the pieces are no longer sticky or wet but slightly tacky to the touch. The drying time will vary depending on your humidity and the thickness of your ginger pieces.
- Don't discard the leftover syrup! This is your second amazing byproduct: ginger simple syrup.
- Crystallize the Ginger:
- Once the ginger pieces are dry and tacky, place about 1/2 cup of granulated sugar into a shallow bowl.
- Working in batches, toss the dried ginger pieces in the sugar, ensuring each piece is thoroughly coated. The sugar will adhere to the slightly sticky surface, creating the characteristic "crystallized" appearance.
- Shake off any excess sugar.
- Return the sugar-coated ginger pieces to the wire rack for another hour or two to fully dry and set the sugar coating. This helps prevent clumping during storage.
Beyond the Bite: Delicious Byproducts from Your Ginger Adventure
One of the true joys of making how to make crystallized ginger is the bonus bounty you receive. Nothing goes to waste!
Aromatic Ginger Tea
The liquid from the initial blanching step is infused with ginger's natural flavor and beneficial compounds. Don't pour it down the drain!
- To Use: Simply add a squeeze of fresh lemon juice and a touch of honey or your preferred sweetener. This warm, soothing tea is fantastic for a cold day, a sore throat, or just as a comforting, digestive aid. You can also chill it and enjoy it as a refreshing iced tea.
Versatile Ginger Simple Syrup
After cooking the ginger in sugar and water, you're left with a concentrated, aromatic ginger-infused syrup. This sweet elixir is incredibly versatile.
- To Use:
- Beverages: Stir it into cocktails (like a Moscow Mule or whiskey sour), mocktails, iced tea, or lemonade for a spicy-sweet kick.
- Baking: Drizzle over pancakes, waffles, fruit salads, or yogurt.
- Cooking: Use it as a glaze for roasted carrots, pork, or chicken, or whisk into salad dressings for an intriguing flavor note.
- Storage: Store the cooled syrup in an airtight container in the refrigerator for up to 2-3 weeks.
Creative Ways to Enjoy Your Homemade Crystallized Ginger
Now that you've mastered how to make crystallized ginger, let's explore the myriad ways to savor your delicious creation:
- Standalone Snack: Its sweet, spicy, and chewy nature makes it an irresistible treat all on its own. Perfect for satisfying a sweet tooth with a little kick.
- Baking:
- Chop it up and fold into cookie dough, muffin batter, gingerbread, or fruitcake for bursts of flavor.
- Use it as a delightful topping or garnish for cakes, tarts, and other desserts.
- Incorporate into scone dough for a morning delight.
- Dessert Garnish: Sprinkle over ice cream, custards, or fruit parfaits for an elegant finish.
- Chocolate Pairing: Dip pieces in melted dark chocolate for a sophisticated confection.
- Hot Beverages: Add a piece to your cup of hot tea or coffee for an extra layer of flavor and warmth.
- Savory Dishes: While predominantly sweet, a finely minced piece can add depth to certain savory dishes, such as glazes for ham or pork, or even in Asian-inspired stir-fries for a touch of sweetness and heat.
- Gifting: Pack your homemade crystallized ginger into pretty jars or bags for a thoughtful and unique edible gift during the holiday season or any time of year.
Storage Tips:
Store your homemade crystallized ginger in an airtight container at room temperature for up to 2-3 weeks. For longer storage, you can keep it in the refrigerator for up to 2 months, or freeze it for several months. Just ensure it's completely dry before storing to prevent clumping and mold.
Making your own crystallized ginger is a culinary adventure that yields truly remarkable results. From the delightful aroma that fills your kitchen to the versatile byproducts and the exquisite final product, every step is a treat. So, grab some fresh ginger, follow these easy steps, and discover the joy of creating this sweet, spicy, and utterly addictive confection right in your own home!
